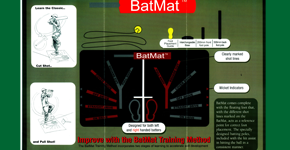
CRICKET BATMAT
  • Home
  • Pricing
  • Training Guide
    • Training Guide Introduction
    • Training Guide - Step 1
    • Training Guide - Step 2
    • Cricket Batting Tips
  • Contact Us

Cricket training guide - Stage 1

Picture

Where to use batmat for stage 1?

After you have followed the “General Batting Tips” for grip, stance and backlift you are now ready to begin using BatMat. 

​
Note: As a safety precaution make sure that your friends, coach or parent stand at least 4 metres clear of the BatMat when you being practicing the various shots.

Picture

Stance

There are two feet markings on the BatMat to indicate the barring stance. The right foot marking is red and the left foot marking is grey. Place your feet on the markings provided.

Picture

Learning the different shots

The first step of the BatMat training method is to familiarise yourself with the different types of shots you can learn to play using the BatMat.

Picture

Front foot shots

The front foot shots marked on the BatMat – on drive, straight drive, off drive and cover drive should be played with a straight bat. In a normal game of cricket these shots are played to balls that are pitched full in length.

Picture

Back foot shots

The back foot shots marked on the BatMat – square cut and pull shot should be played with a cross bat. In a normal game of cricket these shots are played to balls that are short pitched and would normally bounce around hip height.
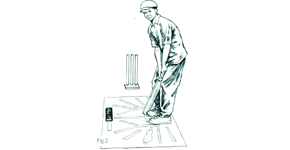
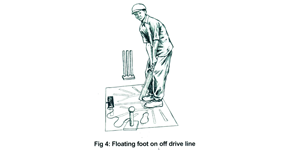
Picture

Using the floating foot

The yellow floating foot is designed to help the batters move their foot into the correct position to learn the various batting shots. The floating foot is placed on the line of the shot in which you are going to practice. Make sure that the floating foot is placed at an easy stepping distance. It is important that the foot is not placed too far forward or back as the batter may overbalance when playing the shot. For example, if you are going to learn to play an off drive, the floating foot is placed on the off drive line.
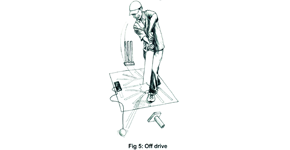
Picture

Practising front foot shots

This section demonstrates how to practice front foot shots. The example used below is an off drive played by a right hand batter. Note that the small pole is used for this shot.
  1. The floating foot is placed on t he red off drive line at an easy stepping distance (as illustrated under “Using the floating foot”).
  2. The small batting pole is placed approximately 10cm on the inside of the yellow floating foot (level with the top of the foot with the ball sitting on top of the pole).
  3. The batter stands with both feet on the stance markings.
  4. The batter then lifts the bat (as described und the backlift tips) and at the same time moves their left foot from the grey marking onto the yellow floating foot.
  5. The batter then swings the bat in a straightforward motion and hits the ball off the batting pole in the direction of the off drive line. Make sure that after hitting the ball the bat is swung in an arc through the line of the ball and finishes over the left shoulder.
If you are a left hand batter the floating foot is placed on the grey off drive line with the small batting pole placed approximately 10cm on the inside of the yellow floating foot front foot (level with the top of the foot). Follow the same steps as described above.
The same process as described above is used for all front foot shots. Just remember to move the floating foot onto the clearly marked line of the shot that you want to practice and place the small battling pole and ball approximately 10cm on the inside of the yellow floating foot (level with the top of the foot).
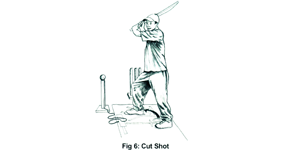
Picture

Practising back foot shots

We have included two illustrations here to help you practice both of the back foot shots – the square cut and the pull shot. For illustration purposes we have used a right hand batter.

Picture

The square cut

Note that the large pole is used for this shot.
  1. The floating foot is placed on the red square cut line at an easy stepping distance.
  2. The pole is placed at a distance where the batter can fully extend the bat in the direction of the shot (this may mean the pole is placed off the mat on the ground). The pole should be placed in line with the direction of the square cut line with the ball sitting on top of the pole.
  3. The batter stands with both feet on the stance markings.
  4. The batter then lifts the bat (as described under the backlift tips) and at the same time moves their right foot from the red foot marking onto the yellow floating foot.
  5. The batter then swings the bat in a cross bat motion and hits the ball off the batting pole in the direction of the square cut line. Make sure that after hitting the bat is swung across the body with the bat finishing over the left shoulder.
If you are a left hand batter the floating foot is placed on the grey square cut line with the large batting pole placed at a distance where the batter can fully extend the bat in the direction of the shot. Follow the same steps as described above.

Picture

The pull-shot

Note that the large pole is used for this shot.
  1. The floating foot is placed on the red pull-shot line at an easy stepping distance.
  2. The pole is placed at a distance where the batter can fully extend the bat in the direction of the shot. The pole is to be placed towards the front of the BatMat near the end of the red cover drive line (see fig.8) with the ball sitting on top of the pole.
  3. The batter stands with both feet on the stance markings.
  4. The batter then lifts the bat 9as described under the backlift tips) and at the same time moves their right foot from the red foot marking onto the yellow floating foot.
  5. The batter then swings the bat in a cross bat motion across their body and hits the ball off the batting pole. When playing the pull shot the batter, as they make contact with the ball, should swivel around on their back boot so that after striking the ball they finish up facing in the direction of where the ball was hit. The bat should also finish over the left shoulder.
If you are a left hand batter the floating foot is placed on the grey pull shot line with the large batting pole placed at a distance where the batter can fully extend the bat in the direction of the shot. Follow the same steps as described above.

Related Articles

  • Introduction​
  • Stage #2 Advanced
  • General Batting Tips
John Doobie - Cricket Batmat
Dandenong Sth, Victoria Australia
Ph: 0414441517

2018 © Cricket Batmat. All Rights Reserved.

  • Home
  • Pricing
  • Training Guide
    • Training Guide Introduction
    • Training Guide - Step 1
    • Training Guide - Step 2
    • Cricket Batting Tips
  • Contact Us